Pillowy Perfection: No-Fuss Overnight Sourdough Ciabatta Rolls (18-24hr Cold Ferment!)
There’s something truly magical about a perfectly baked ciabatta. That crisp, crackly crust giving way to an incredibly open, airy, and chewy interior. It’s the kind of bread that elevates any meal, from a simple soup to a gourmet sandwich. Many home bakers find ciabatta intimidating, but I’m here to tell you it doesn’t have to be!
This recipe for sourdough ciabatta rolls is designed for delicious results with minimal hands-on time, thanks to a genius 18-24 hour cold fermentation. Plus, we’re skipping the autolyse step and incorporating salt right from the start, simplifying the process without sacrificing that signature open crumb and tangy sourdough flavor.
Ready to bake some bread that will impress everyone (especially yourself)? Let’s dive in!
Why This Recipe Works: The “No Autolyse” & Cold Ferment Magic
You might be used to sourdough recipes that call for an autolyse – a period where flour and water rest together before salt and starter are added. While autolyse is fantastic for gluten development, we’re taking a different approach here that’s just as effective and a bit more streamlined
- Salt in the Water First: By dissolving the salt in the warm water before adding the starter and flour, we ensure even distribution from the get-go. This method works perfectly for a highly hydrated dough like ciabatta, allowing gluten to develop beautifully through stretch and folds as the fermentation progresses.
- 18-24 Hour Cold Fermentation: This is where the magic happens!
- Enhanced Flavor: A long, slow cold ferment allows the sourdough starter to work its magic, developing a deeper, more complex flavor profile.
- Improved Crumb Structure: The cold slows down fermentation, giving gluten more time to strengthen and create that characteristic open, irregular crumb.
- Easier Handling: Cold dough is less sticky and much easier to handle when it comes time to shape your rolls.
- Flexible Schedule: It allows you to fit bread baking into your life, rather than building your day around it. Mix on Day 1, bake on Day 2!
Ingredients:
- 350 grams (approx. 1½ cups) Warm Water: Aim for around 80-90°F (27-32°C)
- 11 grams (approx. 1¾ tsp) Kosher Salt: Or fine sea salt. This is a crucial amount for flavor and dough structure.
- 100 grams (approx. ½ cup) Active Sourdough Starter: Your starter should be fed and bubbly, at its peak activity.
- 450 grams (approx. 3½ cups) Bread Flour: High protein content is key for that chewy ciabatta texture.
Equipment You Might Find Helpful:
- Large mixing bowl
- Dough scraper
- Plastic container with a lid for cold ferment (this isn’t necessary but recommended)
- Kitchen towel (or plastic wrap)
- Kitchen scale (for accuracy!)
- Parchment paper
- Large baking sheet or pizza stone
Step-by-Step Instructions: Your Ciabatta Journey
Day 1: The Mix & Bulk Ferment
1. Hydrate & Dissolve: In your large mixing bowl, add the warm water. Stir in the kosher salt until it is completely dissolved. This is important for even distribution in the dough.
2. Add Starter: To the salted water, add your active sourdough starter. Whisk gently until the starter is mostly incorporated.
3. Introduce Flour: Add the bread flour to the wet mixture. Using your hands or a Danish dough whisk, mix until no dry streaks of flour remain. The dough will be very shaggy and sticky – resist the urge to add more flour! Just ensure everything is hydrated.
4. Initial Rest: Cover the bowl loosely with plastic wrap or a damp towel. Let the dough rest in a warm spot for 30 minutes to 1 hour. This brief rest allows the flour to fully hydrate before we start developing gluten.
5. Stretch & Folds (The Gluten Development): This is where we build strength in our high-hydration dough. Over the next 2-3 hours, perform 3-4 rounds of stretch and folds, spaced 30-45 minutes apart. I like to do 2 (two) stretch and folds and 2 (two) coil folds. After you finish doing your stretch and folds (and coil folds), cover the bowl with plastic wrap, bowl cap, or towel. Now you are in the bulk ferment stage (↓). *NOTE: This is the process before cold fermentation.
Stretch and Fold: With wet hands, gently grab a portion of the dough from one side, stretch it upward, and fold it over to the opposite side of the bowl. Rotate the bowl and repeat this 3-4 times until you’ve worked your way around. The dough will feel sticky initially but will become smoother and more elastic with each round.
The Coil Fold:
With wet hands, slide beneath the center of the dough and lift, allowing gravity to tuck the trailing ends neatly under themselves to form a taut, compact package.
Bulk Ferment – The Observation:
This is the most challenging lesson in sourdough baking: learning when to stop. The 4–6 hour range is merely a guideline; the dough dictates the actual timeline.
1. The Target Rise
The dough must be transferred to the cold fermentation (CF) before it reaches its full double. If you let it rise to 100% now, you will lose the crucial oven spring later.
- The Goal: The dough should increase in volume by 50% to 75%from its initial marked height.


Check out the “jiggle” test in the video below↓
2. The Readiness Indicators
Watch for the following physical transformations that signal readiness:
| Indicator | Description | Signification |
|---|---|---|
| The Surface | The formerly shaggy, sticky surface should have smoothed out, displaying a taut, glossy skin studded with large, visible micro-blisters (alveoli). | The yeast activity is intense and creating structural pockets of gas. |
| The Jiggle Test | Gently nudge the container. The dough should not slump back immediately, but rather wobble like a giant, very thick gelatinous mass. It should appear slightly domed, not flat. | The developed gluten network is strong enough to trap the gas. |
| The Bubble Count | Look through the bottom and sides of the clear container. You should see countless small, uniform bubbles throughout the mass, not just large, isolated ones. | The fermentation is even and aggressive. |
| The Smell | The aroma should shift from mildly yeasty to pleasantly acidic, rich, and slightly sweet—the beginnings of complex sourdough flavor. | The beneficial bacteria (LAB) are producing flavor compounds. |
The Checklist and Transition:
If the dough hits the 75% rise mark at 4 hours, it must continue to the next stage. If it takes 6 hours, that is equally correct. You are serving the dough, not the schedule.
1. Slow Fermentation Checklist (Tardy Dough)
If you are nearing the 6-hour mark and the dough has only risen 25%:
- Action: Increase the ambient temperature slightly. Move the container to a warmer spot. Ciabatta dough needs the warmth to achieve the necessary structure before the cold sleep.
- Note: If the yeast starter (levain) was weak when incorporated, the time may extend to 7 or 8 hours. Do not rush the 75% rise.
2. Fast Fermentation Checklist (Rushing Dough)
If the dough reaches 75% rise after only 3 hours (usually due to a very warm kitchen or a very young, aggressive starter):
Action: Transition immediately. The dough is ready. Do not wait for the designated 4-hour minimum. Letting it overproof will result in a heavy, slack dough with poor oven spring.
3. The Tipping Point (The Pre-Cold Move)
Once the dough has achieved 50% to 75% rise, you are done with the room temperature phase.
- Seal and Label: Securely cover the container (if it doesn’t have an airtight lid, use plastic wrap). Label it with the date and time.
- The Transfer: Immediately move the dough to the refrigerator, set to 38°F–40°F (3°C–4°C).
The Cold Ferment (18-24 Hours of Flavor Magic): The sudden cold will drastically slow fermentation, locking in the gas (structure) and the complex flavor (acidity). This is the start of the 18–24 hour Cold Fermentation, where your bread will gain its distinctive ciabatta depth and the easy workability required for shaping the following day.


Day 2: Shape & Bake
- Prepare Your Workspace: About 1 hour before you plan to bake, take your dough out of the fridge. While it’s still cold (which makes it easier to handle), generously flour your work surface with bread flour.
- Gently Release the Dough: Using a dough scraper, gently coax the cold dough out of its container onto your floured surface. Do not punch the dough down! Handle it as gently as possible to preserve the air bubbles.
- Divide & Shape: Using your dough scraper, gently nudge the dough into a rough rectangle. Then, cut the dough into 6-8 equal-sized ciabatta rolls. Avoid excessive handling. You can gently stretch each piece into a more defined rectangular shape, but don’t overwork it. The goal is to maximize the open crumb.
- Final Proof: Carefully transfer your shaped ciabatta rolls to a large sheet of parchment paper that’s been generously floured (I like to use rice flour as it doesn’t burn like regular flour). Give them some space as they will puff up. Loosely cover them with a light cloth (a clean kitchen towel works great) and let them proof at room temperature for 45-60 minutes, or until slightly puffy but not overly deflated when gently poked.
- Preheat Oven & Bake: Preheat your oven to 475°F (246°C) with a baking stone or a heavy baking sheet inside. If you have a Dutch oven, you can bake them in batches, or place a tray of hot water in the bottom of your oven for steam. Carefully transfer the parchment paper with the rolls onto your preheated hot baking surface. You can also bake them on the parchment lined pan if you would like. Both work fine.
- Bake for 20-25 minutes, or until the crust is deeply golden brown and sounds hollow when tapped on the bottom. If using a Dutch oven, bake covered for 15 minutes, then uncovered for 10-15 minutes more. Bake at 475°F (246°C) for 10 minutes then lower the temperature to 450°F (232°C) for the final 10-15 minutes of baking.
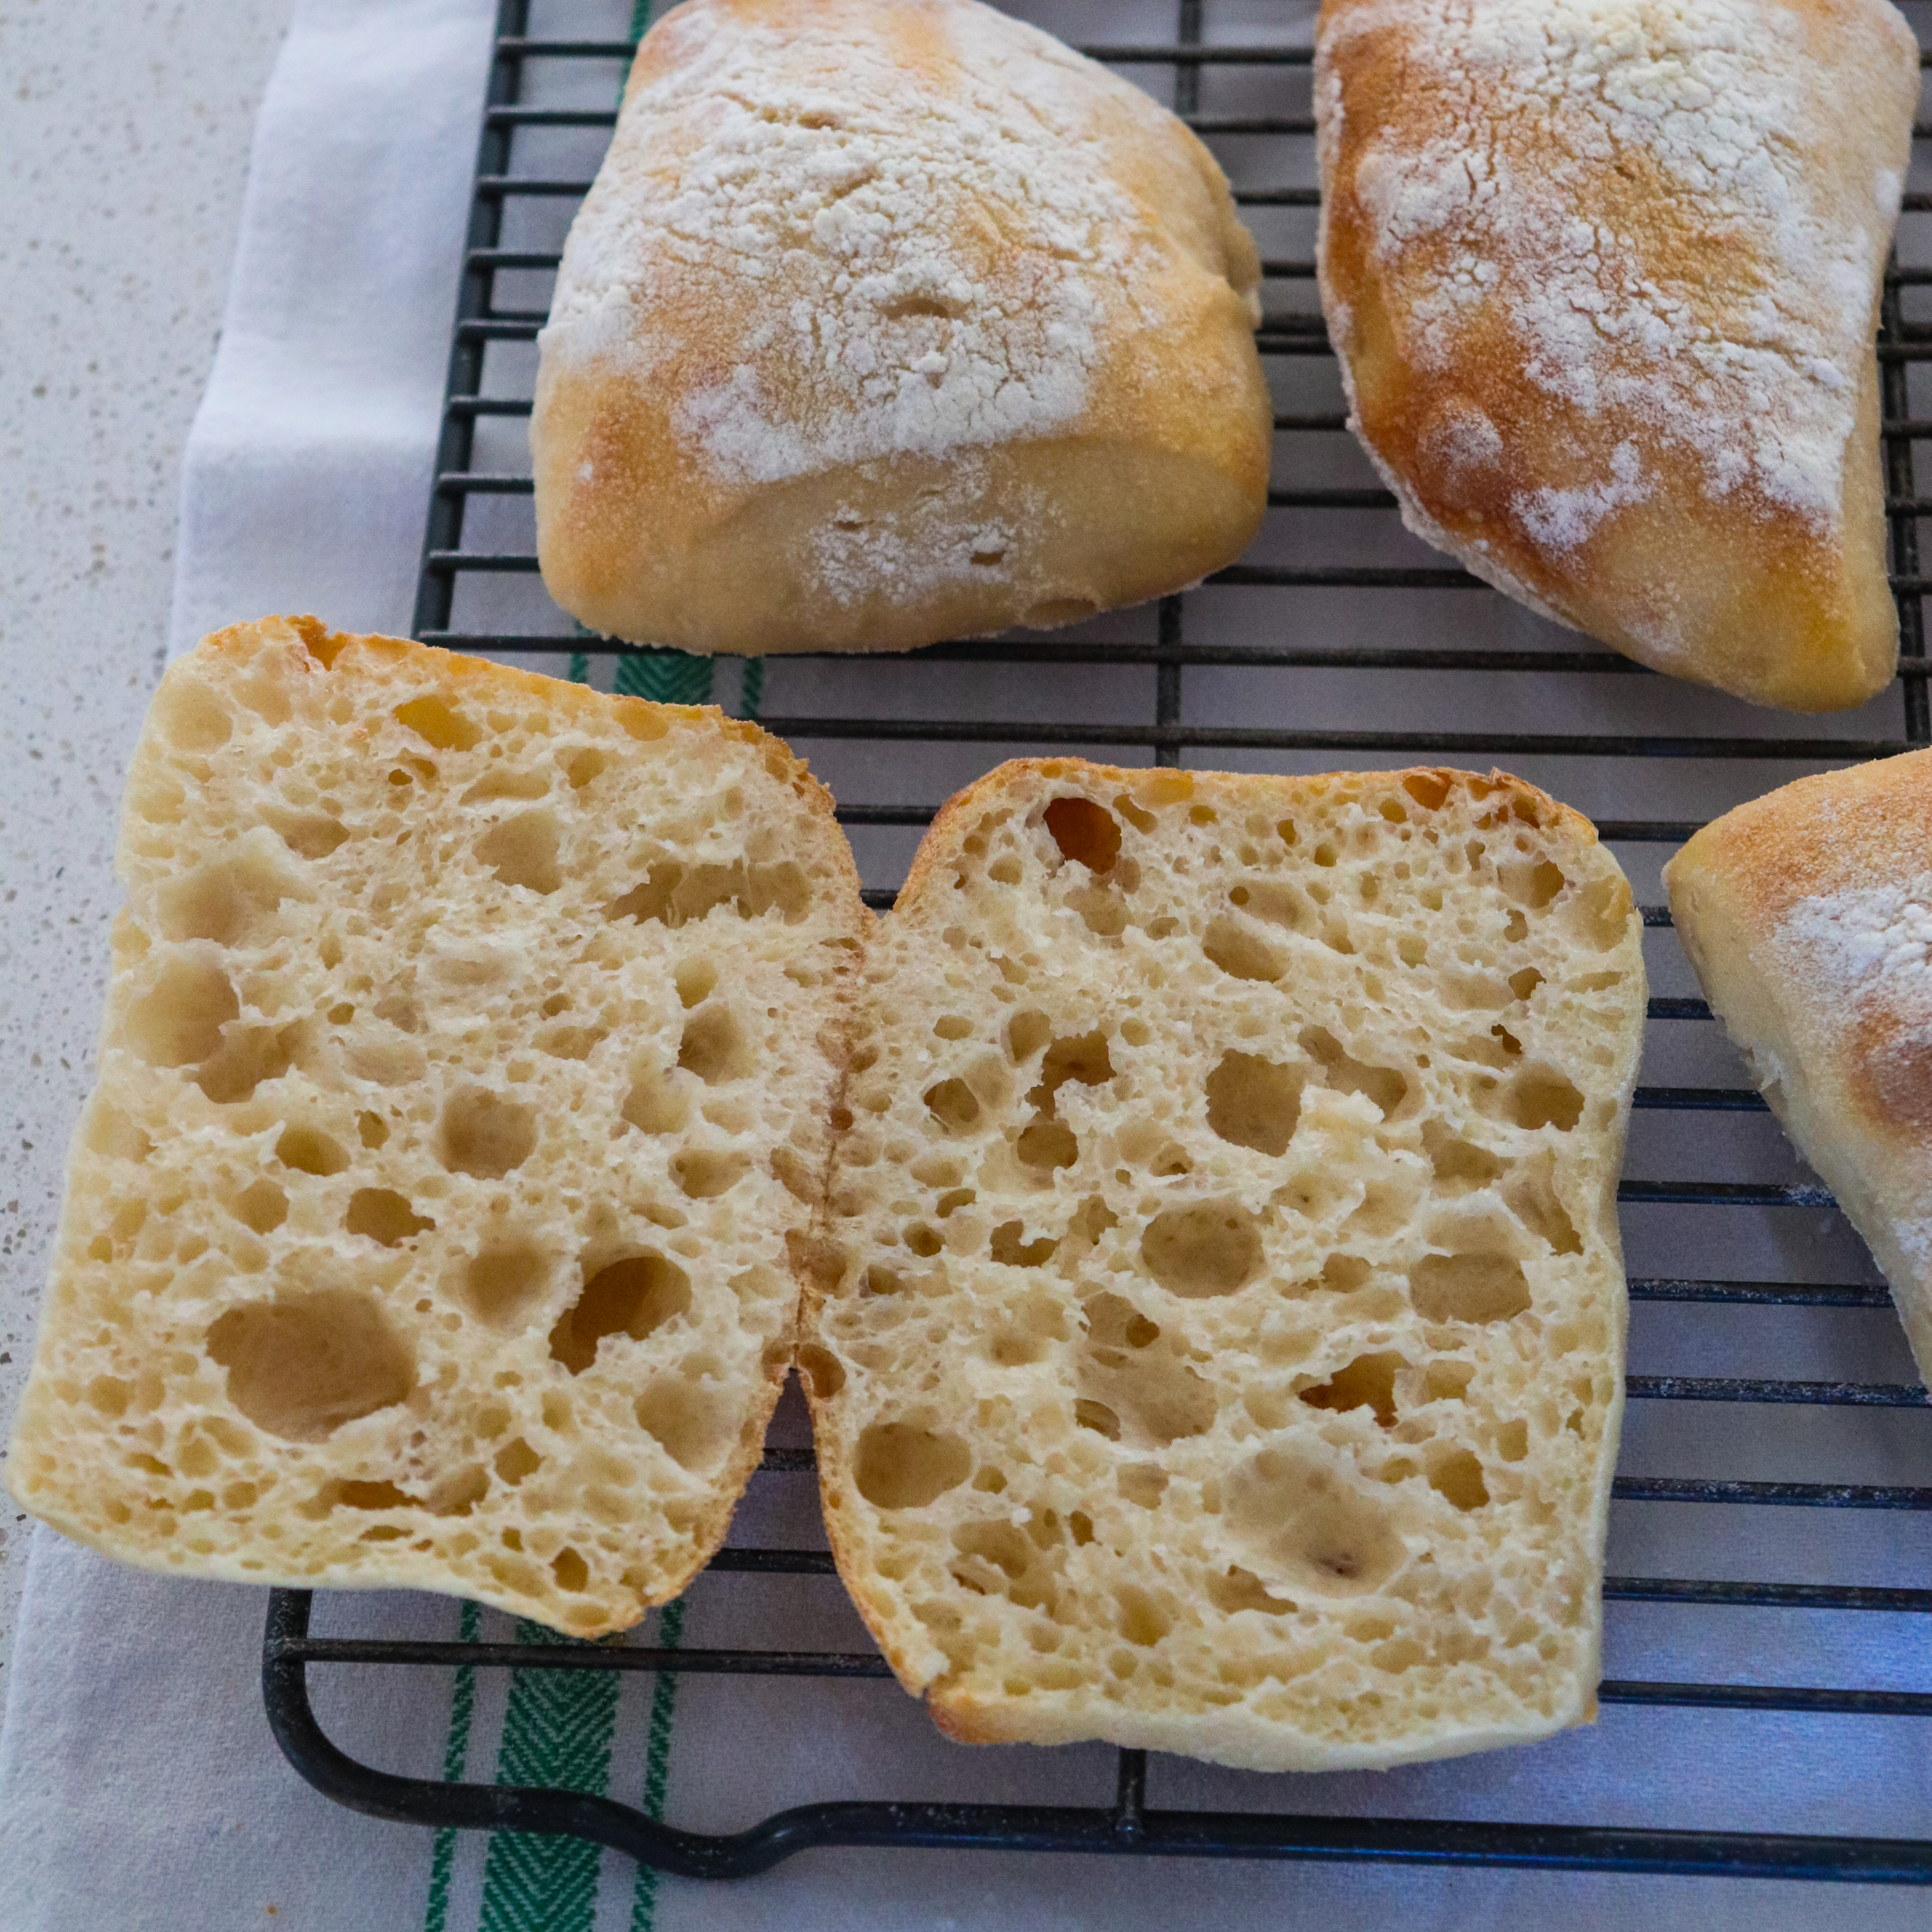
- Cool Completely: Transfer the baked ciabatta rolls to a wire rack to cool completely. This step is crucial! Cooling allows the crumb to set and the flavors to fully develop. Resist the urge to cut into them too soon (it’s hard, I know!).


Serving Suggestions:
- Classic: Slice and serve with good quality olive oil for dipping.
- Sandwiches: The perfect vessel for caprese, roasted vegetables, or deli meats.
- Soup Dipper: Ideal for soaking up hearty stews and creamy soups.
- Garlic Bread: Brush with garlic butter and toast for an incredible side.
Tips for Sourdough Ciabatta Success:
- Active Starter is Key: Ensure your starter is fed, bubbly, and active. A sluggish starter will lead to a dense crumb.
- Don’t Fear the Stickiness: Ciabatta is a very high hydration dough. It will be sticky. Embrace it! Wet hands and a dough scraper are your best friends.
- Gentle Handling: Once the dough is out of the fridge, handle it as little and as gently as possible to preserve those precious air bubbles.
- Steam is Your Friend: A steamy oven environment in the first part of baking helps create that glorious, crisp crust.
- Listen to Your Dough: Timings are guidelines. Watch for signs of activity during bulk fermentation and puffiness during the final proof.
- Experiment: Every oven is different. Don’t be afraid to adjust baking times slightly.
There you have it! A straightforward, incredibly rewarding recipe for sourdough ciabatta rolls that fits into your busy schedule. Get ready to enjoy the ultimate in airy, chewy, tangy bread.
Happy Baking! Let me know how your ciabatta turns out in the comments below!